这篇文章记录了如何快速使用使用Fuwari创建个人博客的过程。
克隆项目
1.使用Fuwari模板仓库创建新的仓库。
2.创建好仓库后,使用Vscode将仓库克隆到本地。
3.运行 pnpm install 和 pnpm add sharp 安装依赖项。
如果电脑上没有安装pnpm,则需要先运行npm install -g pnpm。
4.使用npm run dev启动项目,如果正常的话,现在已经可以看到页面。
修改配置
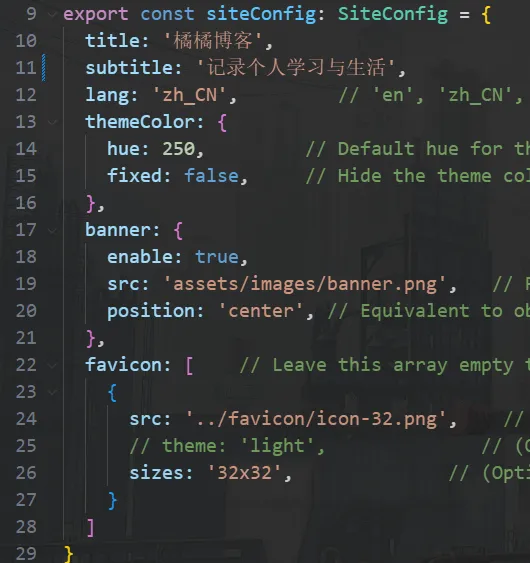
1.编辑配置文件 src/config.ts 以自定义博客内容
siteConfig:包括了网站的标题,描述,主题色,头图和网站图标
navBarConfig:网站顶部导航栏菜单内容,如果要添加新的站内跳转按钮需要调整
src\types\config.ts的LinkPreset对象,src\constants\link-presets.ts的LinkPresets对象,同时需要在navBarConfig.link里添加对应的引用profileConfig:个人简介的资料,包括了头像,名字,个人链接
licenseConfig:每篇文章下面会显示的许可信息,默认开启

2.修改配置文件astro.config.mjs确保编译后的路径是正确的
export default defineConfig({
  site: "https://<你的github账号名字>.github.io",
  base: "/<你的仓库名字>",
  ...
})
3.在你的项目中的 .github/workflows/ 目录创建一个新文件 deploy.yml,并粘贴以下 YAML 配置信息。
name: Deploy to GitHub Pages

on:
  # 每次推送到 `main` 分支时触发这个“工作流程”
  # 如果你使用了别的分支名,请按需将 `main` 替换成你的分支名
  push:
    branches: [ main ]
  # 允许你在 GitHub 上的 Actions 标签中手动触发此“工作流程”
  workflow_dispatch:

# 允许 job 克隆 repo 并创建一个 page deployment
permissions:
  contents: read
  pages: write
  id-token: write

jobs:
  build:
    runs-on: ubuntu-latest
    steps:
      - name: Checkout your repository using git
        uses: actions/checkout@v4
      - name: Install, build, and upload your site
        uses: withastro/action@v2
        with:
          # path: . # 存储库中 Astro 项目的根位置。(可选)
          # node-version: 20 # 用于构建站点的特定 Node.js 版本,默认为 20。(可选)
          package-manager: pnpm@latest # 应使用哪个 Node.js 包管理器来安装依赖项和构建站点。会根据存储库中的 lockfile 自动检测。

  deploy:
    needs: build
    runs-on: ubuntu-latest
    environment:
      name: github-pages
      url: ${{ steps.deployment.outputs.page_url }}
    steps:
      - name: Deploy to GitHub Pages
        id: deployment
        uses: actions/deploy-pages@v4
部署项目
这里使用Github page部署,如果是使用其他方式部署项目请参考链接
1.完成以上工作后,在Gtihub仓库的设置页面Page选择Github Actions作为Source,保存。
2.在vscode提交并推送项目到Github
3.设置仓库的visibility为public
到这里,已经可以算完成个人博客的创建了。
你可以使用pnpm new-post <name>来创建新的文章

